I have loved this hostess set since the moment I laid eyes on it in the new catalog--Faith in Nature. I'm normally not a huge fan of "realistic" stamp sets like these, but my opinion toward this genre are slowly changing with each new catalog (and maybe with my increasing age...) :)
I was inspired by the sample on page 13 of the 2011-2012 Idea Book & Catalog. I loved the watercoloring that was done on the pear image. I'm not a huge fan of watercoloring, so I just used a sponge dipped in the classic ink pad. I really like how this one turned out!

I used More Mustard, Pear Pizzazz, Pool Party, Soft Suede, and River Rock. I found this beautiful color combination from the Spice Cake Designer Series Paper in the 2011 Holiday Mini. Love.
Happy Stamping!
Cari
10.24.2011
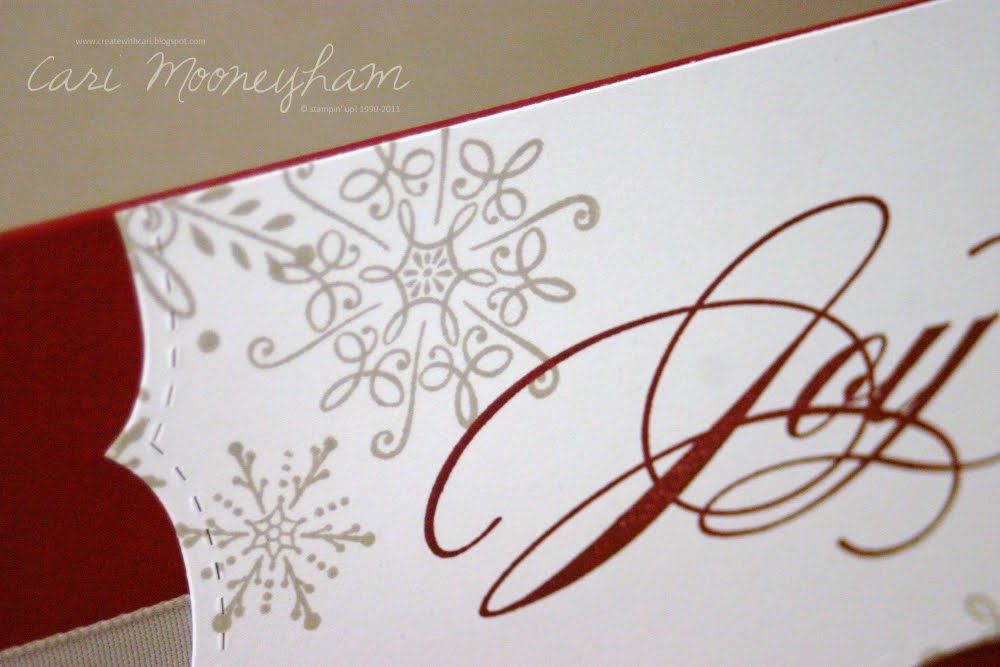
Faith in Nature Thank You
10.22.2011
Charlotte's First Year Scrapbook-Weeks 13-14
Here are the pages from Charlotte's 13th and 14th weeks of life. It's funny--I'm already losing track of how many weeks old she is. We've quickly turned to counting her age in months...and soon we'll just be counting years. I can't believe how quickly time passes!
Click here to see the other pages!
10.15.2011
The Most Wonderful Time: Session 1
Join me next weekend for Session 1 of The Most Wonderful Time 2011 class series! We'll be making 10 Christmas cards, 5 each of these two designs:


The registration fee is $15
Click here to register by Monday, October 17th
It's the Most Wonderful Time of the Year! Get a head start on this year's Christmas cards! Can't make this session? Make plans to attend one of the other sessions on November 5, November 19, or December 3!
Happy Stamping!
Cari
10.12.2011
Charlotte's First Year Scrapbook-Weeks 11-12
Charlotte is actually turning 4 MONTHS OLD tomorrow! Crazy! Here are weeks 11 & 12 from a few weeks ago:
Click here to see the other pages!
10.11.2011
Flirtatious
I LOVE this new Specialty Designer Series Paper! The colors are so fun: Melon Mambo, Pumpkin Pie, Wisteria Wonder, and Pretty in Pink. I saw a nice tutorial on paper quilling over on Mary Fish's blog, and I loved the card she made so I changed a few things and made one of my own!

Another great new accessory I used on this card is the Melon Mambo 1/2" Scalloped Dots Ribbon. I have it in several other colors as well, and I am LOVING it! The border punch I used was the Scallop Trim Border Punch, and the Basic Pearls were perfect centers for my rosettes. Such a fun card! Now I just have to decide who to send it to... :)
Happy Stamping!
Cari
10.09.2011
It's was a Fabulous Social!
We had an incredible time! Unfortunately, I didn't get any pictures taken during the party, but I have a few "before" pictures and a few pictures of the projects we completed. Enjoy!


If you're interested in getting one of these dresses (she makes KU ones too...boo!), my mom got it from a lady who has a business called Homespun Crafts.
Happy Stamping!
Cari
10.04.2011
Fall Time
Yep, it's official. The trees are changing colors, the weather is getting cooler, and I spend all my Saturdays wearing purple and watching football. Since my house was still decorated for the 4th of July (and the only reason it was even decorated for the 4th was because I decorated before Charlotte was born...), I thought it was maybe time to bust out the fall decor. For the record, fall and Christmas decor is my FAVORITE! I have tons (compared to my decor for other seasons) of decorations for both seasons, so I always love unpacking my boxes and finding new fun ways of decorating.
This year's decorating experience was even more fun than usual because of Pinterest. Yes, I caved. It's worse than Facebook (in terms of "black hole" capabilities). Anyway, I found a super cute idea that ended in my going immediately to the convenience store located in the basement of our building to buy a bag of dried split peas. The hubs thought I was crazy...well, I'm sure he already thought that but he told me so when I insisted on buying peas for my fall decorations.
Okay, so I did use some Stampin' Up! stuff for my decor (hence the reason for my post...you knew I'd get there). The main thing I used was my Big Shot (which, by the way, is currently FREE to new demonstrators in October!) with the Leaves #2 die and the Square Lattice textured impressions embossing folder. I also used a new yummy color combo, Cajun Craze, More Mustard, Old Olive, and Soft Suede. Love it!
The thing I'm probably most proud of in my fall decorations is this amazing idea, compliments of my little sis. For her wedding in June, she put her wedding monogram on her unity candle. GET OUT! I had no idea you could do this! Anyway, I remembered how cool it was and wanted to put a Bible verse on one of my candles. I called her IMMEDIATELY and got the instructions:
- Print or stamp you image on white tissue paper (like the tissue paper you would use to stuff in a gift bag). I designed my image in Word and used the font colors that matched my color combo from above.
- Cut out your image (trim close to the edges of the image).
- Place the image on your candle where you want it and wrap waxed paper around the candle to hold the tissue paper in place.
- Use a heat gun to slightly melt the candle, thus melting your tissue paper into the candle. Once you see the candle get glossy, that area is done.
- Peel off the waxed paper.
Easy peasy!

This was my Pinterest idea (for which I needed that vital bag of dried split peas):

I've got several other areas in my little apartment with little hints of fall, but I don't have any pics. So my house isn't perfect, nor are my decorations, but it was fun to do what I could! Enjoy!
-Cari
9.27.2011
This Weekend! It's a Stamping Social!
If you're in the Chicago area, plan to be at my place Saturday afternoon! It's going to be more fun than you'll want to miss :)
9.24.2011
Charlotte's First Year Scrapbook-Weeks 9-10
She's growing up so fast! It's hard to keep up! Here are weeks 9 & 10:
Click here to see the other pages!
9.22.2011
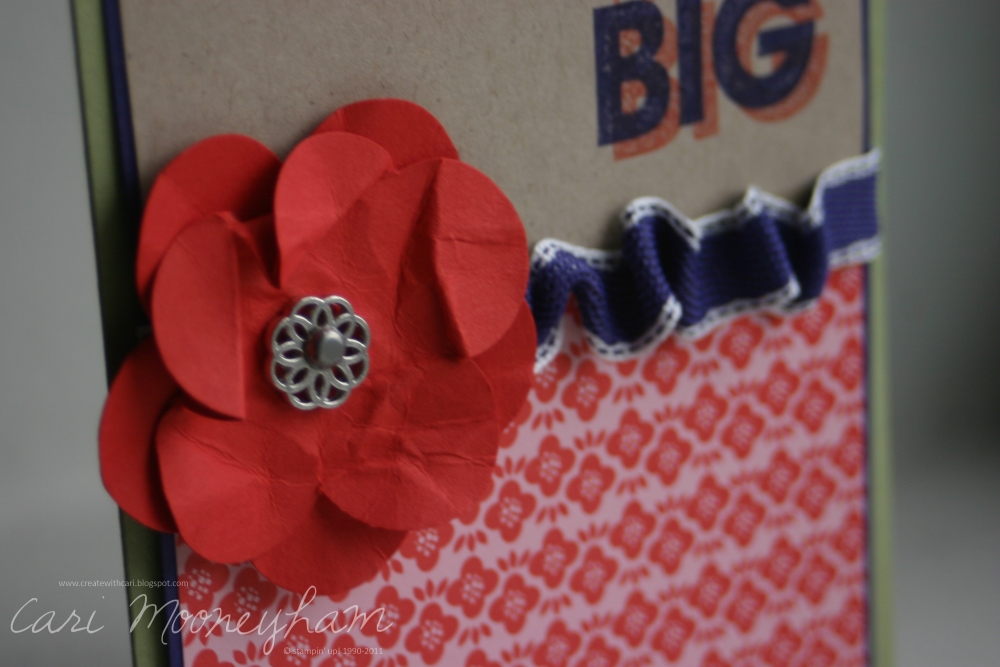
Wish Big
Here is the card I made for my mom for her birthday last month. I was just planning to play with a few new products that I had just ordered, but the card turned out way cuter than I was planning, so I sent it to my mom! Now, this idea goes completely opposite the mantra from my first stamp club: "Oops! I messed that up! Oh well, I'll just send it to my mom..." (we were operating under the assumption that moms always love things their daughters make for them--even when they're messed up!). I know my mom loves everything that I make for her, but when I make something that I think is especially cute I have to send it to somebody that will appreciate the time I took to make it! That person is almost always my mom! Plus, this card had the super cute Concord Crush Stitched-Poly Ribbon. My mom's favorite color (by far!) is purple, so I knew this was the perfect card for her! Happy Birthday, mom!
Happy Stamping!
Cari
P.S. My Little turned 14 weeks this past Monday! Whoa! And I love baby shoes even more than I love my shoes. That's sayin' somethin'...
 Oh, and sparkle jeans? Yes please!!
9.21.2011
Charlotte's First Year Scrapbook-Weeks 7-8
I'm totally behind on these! Here are weeks 7 & 8:
Click here to see the other pages!
9.20.2011
Danielle's Wedding
So I mentioned a few months ago that I helped design and create wedding invitations, programs, menus, favors, and place cards for my sister, Danielle.

Danielle found an invitation design online that she liked, so I took the idea and ran with it. Using the same general design, I made the programs and the menus. Our family is a bit into the "coordination" thing (i.e. my mom and dad always coordinate their outfits for church on Sunday, as do Ben, Charlotte and I...yeah.), so EVERYTHING that we did for the wedding coordinated. Not just the wedding colors, but literally everything (squares, not circles, pearls, not rhinestones, etc.). It should come as no surprise that we had to coordinate all the paper items too!
All the items used the following colors: Elegant Eggplant, Perfect Plum, Very Vanilla, and Lucky Limeade (well, actually Stampin' Up! didn't come out with Lucky Limeade until after the wedding, but the paper we used was almost exactly the same color!). I only an invitation and program with me here in Chicago, so the pictures of the menus and favors/place cards are from the wedding itself.


For these place cards/favors, we made a tent box with Hershey's nuggets inside--a nugget for each family member sitting together. For example, had our little family been able to sit together (I was at the head table), we would have had a box with three nuggets, and the outside of the box would have said, "Mr. & Mrs. Ben Mooneyham family, Table 8." This seemed like a great idea at the time, but it ended up being a little tricky for those families that changed from five attendees to two at the last minute :) Oh well! It was a fun challenge (especially at 3:00 a.m. the morning of the wedding...). For the nuggets, we printed on address labels four different designs: an image of a bride and groom, the monogram, "David & Danielle", and the wedding date. We wrapped the labels around the nuggets and glued them inside the boxes with snail adhesive. Let me know if you have more questions about these boxes. They were incredibly easy to make, but the directions might be too much to try to post here unless someone really wants them!
All in all, the wedding was a blast, and making all these fun items was the perfect way for me to be able to help out. Since I was in Chicago (and pregnant!), I wasn't able to help with much else for the wedding. Thankfully my sister is pretty easy going about stuff like this, and I guess she just trusted my judgement! I hope she liked the finished products!
Happy Stamping!
Cari
9.18.2011
Thank You's
Charlotte is growing up! She's finally gotten much better at napping in her crib (instead of my arms), so I have much more time for creating and blogging! Yay! I've got tons of stuff to show you, it's just a matter of getting it up here!
Before Charlotte was born, we were lucky enough to have several friends throw us baby showers.


 And my coworkers threw me a shower at work also. I have pictures somewhere, but I can't seem to locate them right now!
Anyway, we got some AMAZING gifts, but I quickly realized that I was going to need to get busy making thank you's for all our gifts! This was one of the cards I made:


I love the technique of crumpling the paper before I adhere it with Stampin' Dimensionals. I never knew how much fun it was to crunch my paper into a ball! Ben even joined in on the fun...he didn't know how much fun stamping could be either :) The card turned out to be a simple design--perfect for duplication!
I used a (now retired) hostess stamp set. I'm not usually one to stamp with "nature" images, but I absolutely LOVE how this one turned out! I've since bought another "nature" set--I'll show you a sample with this set in a few days.
Happy Stamping!
Cari