1.29.2010

Fall To Layout 75

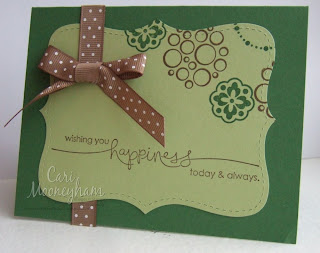
For this quick and easy card, I used a sketch posted last Friday on the Clean & Simple Stamping Blog:


I tried a new color combo, Garden Green, Certainly Celery, and Soft Suede. It's probably not the best, but it's still fun to try new combos :-)


I love using the Big Shot and the Top Note die. It's so quick and easy to make a nice shape to use as an alternative to the basic rectangle. I also love the Clean & Simple blog and their quick and easy card sketches. 10 minute cards are the best! You should check out their blog and try some of the sketches!


*************************************************************************


Stamp Sets: Heard from the Heart (111644—pictured below), Circle Circus (115778—pictured below)
Paper: Garden Green (102584), Certainly Celery (105125)
Ink: Garden Green (102272), Soft Suede (115657)
Cool Tools: Big Shot (113439), Top Note Die (113463)
The Little Something Extra: 1/2” Polka-Dot Grosgrain Ribbon Soft Suede (115612)


1.27.2010

Clear Mount Stamps!

I can't believe I've waited this long to share this amazing new technology with you! Starting with the new Occasions Mini catalog, Stampin' Up! will be offering their stamp sets in both the traditional wood-mount format as well as the NEW clear-mount format!

I'm sure most of you have heard of the clear acrylic stamps and clear blocks offered by some other rubber stamp companies. Stampin' Up! has been working toward a quality product that can compare to these clear stamps. A solution has finally been reached--clear mount stamps!

Clear mount stamps are basically Stampin' Up!'s traditional red rubber die cut stamps, but re-positionable and mounted on clear blocks. This way, the quality of the stamp is not compromised, but the stamper is given the ability to better see exactly where she is stamping. Additionally, the stamps are stored in a DVD-sized case, thus reducing the amount of storage space required!

I was so excited to place my order and kept telling Ben that I couldn't wait for my clear blocks to come in the mail along with my new stamp sets! He just made fun of me for being excited to play with my new blocks :-)

After I got my new Occasions Mini clear-mount stamp sets, I was immediately impressed by how easy it was to prepare the stamps for use. I was so impressed, in fact, that I made a quick tutorial to show you how easy it is!

1. Peel the white backing from the sticker


2. Punch out the stamp


3. Peel the backing from the stamp


4. Line the stamp up with the sticker (super easy because the stamp and the sticker are the same shape! You go Stampin' Up!!)


5. After you've lined up and stuck down the stamp...


6. Peel the stamp back up...and magically, the sticker is attached perfectly! (You know how I love perfection!)


7. Your stamp is ready to mount on a clear block


8. Just press the block down on the stamp for a couple seconds, and your stamp is ready to go!


Yes! It's that simple! I love Clear Mount Stamps! Now for a fun little card made with a new Clear Mount stamp set from the Occasions Mini, Well Scripted:


It was so easy to stamp the "happy birthday" sentiment exactly in the center of my piece of card stock because I could see exactly where I was stamping! Yay! I'm just so excited! Can't you tell!?

Please let me know if you have any questions about the Clear Mount Stamps--I'd be happy to answer any of your questions. And don't worry, I'm sure I'll be sharing many more Clear Mount tips in the coming weeks. Clearly, I love them (no pun intended :-)


**********************************************************************


Stamp Sets: Baroque Motifs (113490—pictured below), Well Scripted (117072-Wood; 118601-Clear —pictured below)
Paper: Pale Plum (101658), Rich Razzleberry (115316), Very Vanilla (101650)
Ink: Rich Razzleberry (115658)
Punches: Scallop Edge (112091)
The Little Something Extra: Silver Brads (104336)


1.24.2010

Mojo Monday 122

I decided at the last minute to take advantage of the Mojo Monday sketch from last Monday:


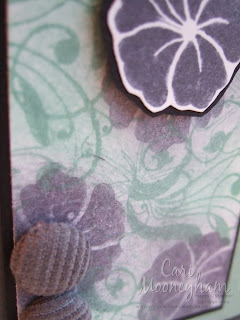
Since I don't have any oval cutting tools, I decided to use an image instead. Making this card pulled me further out of my comfort zone than I've been for quite a while! I used Sage Shadow, a color I have literally NEVER used before. All the Sage Shadow paper that I have is in full sheets--untouched. It was actually fun to get to use a brand new color :-)


My mom had recently emailed me with this fun "faux DSP" technique that she had seen on Gretchen Barron's blog. Although this technique produces a look that I almost never use, I thought it worked well for the way I wanted this card to look. Click here to see the tutorial for this technique.


I stepped outside my comfort zone today, why don't you pull out a color that you have never used (or hardly ever use) and make something fun. Post a comment and let me know how it goes!


**************************************************************************


Stamp Sets: Wings of Friendship (Level 2 Hostess 114308—pictured below), Thank You Kindly (111700—pictured below—also a Sale-a-Bration 2009 set)
Paper: Basic Gray (108692), Basic Black (102851), Sage Shadow (101563), Whisper White (100730)
Ink: Basic Gray (109120), Sage Shadow (102532)
Cool Tools: Big Shot (113439), Stampin’ Up! Backgrounds I (114512), Stamp-a-Ma-Jig (101049)
The Little Something Extra: Basic Gray Corduroy Buttons (114345)


1.21.2010

Helping Stampin' Up Help Haiti

Stampin' Up! has decided to join forces with the American Red Cross to help fund relief work in Haiti. Click here to find out how you can help Stampin' Up! help Haiti.

Additionally, the Stampin' Up! home office has assembled 5,000 Hygene Kits to send to Haiti. Click here to visit So Shelli (the blog of Shelli Gardener, the Co-Founder and CEO of Stampin' Up!) and read her blog post about the relief efforts.

1.14.2010

Valentine's Day Patchwork & Upcoming Class!

This fun little "patchwork" card is going to be part of my 7 Days of Valentine's Class that will be on February 6th (just in time to give away 7 days' worth of valentines to that special someone!)--more details to come!


I was having a terribly hard time with this card because I'm not very good at mixing and matching different embellishments...nor I am good at using any embellishments other than ribbon! One of my new stamping friends observed that I use ribbon on all of the cards that I make. I told her, "No way!"...and then I looked at my card display. Of the at least 40 cards I have displayed, all but 1 card--yes, all but 1--had ribbon on it. Hmm...maybe it's time to branch out and use some different embellishments! So, that's one of my new goals this year--to use embellishments other than ribbon. Of course, I still haven't made a card without ribbon, but I'm at least adding some other stuff to the mix :-)

If you're interested in making this card for yourself, be sure to contact me to register for my class! I'm also offering this class through the mail, so please contact me if you are interested in that option.


****************************************************************************

Stamp Sets: Happy Heart, A (111758—pictured below)
Paper: Pretty in Pink (100459), Chocolate Chip (102128), Real Red (102482), Very Vanilla (101650)
Ink: Pretty in Pink (101301), Real Red (103133), Chocolate Chip (100908)
Punches: Heart to Heart (113694), 1-1/4” Square (104400)
The Little Something Extra: Filigree Designer Brads (112577), Clear Buttons (105447), Chocolate Chip Taffeta Ribbon (109065), Real Red Gingham Ribbon (104827), Stampin’ Dimensionals (104430)

1.11.2010

Decor Elements

Since moving to Chicago, I had not put up any Decor Elements on the walls yet as we weren't quite settled, and I didn't really know what I wanted to do (decor-wise) with the apartment. However, upon getting the opportunity late last fall to receive a Level 2 Hostess gift, I choose the "Dasher" decor element (still available in the Fall-Winter 2009 Definitely Decorative Brochure).


Unfortunately, Dasher sat in his little cardboard tube for weeks as I debated where to put him. I finally decided on the entry way above our little table that is our "pile-it" (you know, the spot where you pile all your mail and other random stuff--coupons, receipts, papers from your purse that you toss there on your way out the door...). I put him a little high, so our keys kind of covered up his antlers a little, but overall, I think it was a good place for him :) Since he was so cute, I tried a little harder to not pile so much stuff there!


But now that Christmas is over, I had to take Dasher down :( I chose the "Serve the Lord" Decor Element to replace Dasher in our entry way. I LOVE it! I think it's the perfect size and the perfect location! I do miss Dasher quite a bit, though, so I just may have to place another huge order to get another Level 2 Hostess gift so I can get another Dasher for next year!


1.08.2010

Valentine's Day Decor

I LOVE decorating my house for the holidays...all the holidays :-) I always like to make at least one new thing for each holiday so I don't end up using the same decorations year after year. When we moved to Chicago, we got a great deal on a 2-bedroom, 2-bathroom apartment, so now I have even more rooms to decorate! I especially like to put one or two small holiday-themed items in the guest bathroom. Today I decided to decorate this lovely red candle I had sitting around my apartment:


I simply wrapped a piece of white organza ribbon around the candle and attached it with a piece of tape on the back. I stamped in Versamark ink on Real Red card stock the heart image and embossed it with clear embossing powder. I cut the heart out by hand. I stamped the "happy valentine's day" sentiment with Real Red ink and punched it out with the modern label punch (one of my new favorites!). You can't really tell in the picture, but I inked the edges of the punch with Real Red ink as well as some champagne shimmer paint (yes!). It looks really nice in real life!


I clipped the sentiment to the heart with a mini library clip and tied a small piece of white taffeta ribbon around the clip. The project was so quick and simple and really looks nice next to the sink.

I set the candle on a white candle plate and scattered some clear crystal "ice" around the candle. So, a little side story about the "ice". When Ben & I got married a few years ago, I decided that I really liked this crystal "ice" and wanted to use it for all of my centerpieces...on all 50 tables. So, after using about a thousand Micheal's, JoAnn's, and Hobby Lobby coupons and completely depleting the stock of all the stores in Topeka, Lawrence, Kansas City, Manhattan, and Wichita, we ended up with enough for all our tables. Thankfully, we kept all of it, so now I have a lovely (abundant) stash of the stuff for all of my decorating needs :)


*********************************************************************


Stamp Sets: Happy Heart, A (111758—pictured below)
Paper: Real Red (102482), Whisper White (100730)
Ink: Real Red (103133), Versamark (102283)
Punches: Modern Label (116630)
Cool Tools: Heat Tool (100005)
The Little Something Extra: Clear Embossing Powder (109130), Mini Library Clips (109857), Organza Ribbon (114319), Whisper White Taffeta Ribbon (109070)

1.06.2010

Out of Shape

You know how when you don't exercise for a while, you get "out of shape" and it's harder than it used to be to perform that exercise? I know that many of you who read my blog know me personally and know that about 8 months ago, I was finishing up my master's degree in Exercise Science & Public Health, and I was an avid group exercise instructor. I was teaching about 7-9 classes per week with no problems whatsoever. It was amazing! I got paid to work out! Unfortunately, I got in the habit of only exercising when I was teaching, so when we moved to Chicago, I wasn't teaching anymore...and therefore I was not exercising anymore. So I decided that I'd join with about 50% of the U.S. population this week in starting a new exercise program for the new year :)

Well, needless to say, 15 minutes into my once normal hour-long workout, I had to quit. I sat down, a little bummed, and decided to stamp instead. Unfortunately, although it has not been quite as long for stamping as it has been for exercising, I was quite "out of shape" for my stamping as well :)

Here's the card I made tonight. It didn't quite turn out like I'd hoped, but at least it's something. This card, like my semi-failed workout, inspired me to really jump back into the things I love and to build myself back up to where I was before!


This card was pretty simple to make. I cut my card stock at 4-1/4" x 11" and scored at 5" and 7-3/4" to make the "Z-fold". The flap tucks right behind the circle and heart and is easy to just pop open and write inside:


The card is pretty simple and self-explanatory, so that's all I'll say about it for now. I hope you're all having a great week!


***********************************************************


Stamp Sets: Happy Heart, A (111758—pictured below), Love You Much (113756—pictured below)
Paper: Bashful Blue (105120), Pretty in Pink (100459), Pumpkin Pie (105117), Melon Mambo (115320), Old Olive (100702)
Ink: Melon Mambo (115656), Bashful Blue (105209), Versamark (102283)
Punches: Heart to Heart (113694)
Cool Tools: Heat Tool (100005), Circle Scissor Plus (112530)
The Little Something Extra: Clear Embossing Powder (109130), Mini Library Clips (109857), Pretties Kit (109114), 5/8” Grosgrain Ribbon Old Olive (109054)


1.05.2010

Sale-A-Brate Good Times! Whoo-Hoo!

It's (almost) the most wonderful time of the year :) Sale-a-Bration is here again! And you've got your chance to earn free products!

Sale-A-Bration, Stampin' Up!'s biggest event of the year, means friends, fresh ideas, and free products! And with three ways to earn exclusive Sale-A-Bration products, there's something for everyone.

* Spend: Buy $50 worth of Stampin' Up! products and get a FREE Sale-A-Bration reward!
* Host: Host a $300 workshop, and get a FREE Sale-A-Bration reward (in addition to all the regular hostess benefits)!
* Join: Become a demonstrator, and receive your Starter Kit for 15% off, PLUS get a FREE stamp set (up to a $47.95 value)!

This promotion ends March 31, so contact me today to spend, host, or join! Or click here to see the Sale-A-Bration brochure.

1.03.2010

Merry Christmas to You (a little late...)

So...I guess Christmas is over...*sigh*...

Ben made me take down the Christmas tree today (*tear), but it's okay, because I'm going to share with you my Christmas Card from this year (which has a Christmas Tree on it!! Yay!)

So I must tell you up front that this card is almost completely a CASE ("copy and share everything") card from Patty Bennett (click here to see her blog).


This card is actually very sparkly, but it's hard to see in the first picture. Here is another picture that shows the sparkles much better:


To make this beautiful "shimmery" sparkle look, I used the Champagne Shimmer Paint (from the 2009 Holiday Mini catalog). Although the Holiday Mini catalog (and all its contents) retire on Monday, January 4, the shimmer paint will remain available as a catalog write-in through the end of the current 2009-2010 Idea Book & Catalog! However, if there are other items in this catalog you want, be sure to click here to place your order now!

I used the Petals-A-Plenty Embossing Folder to make the Christmas Tree. Be sure to visit Patty's Blog for instructions on how to make the tree.


To make the star shimmery, I used the shimmer paint on a piece of white card stock. I allowed the paint to dry, then I punched the star out of the paper. It was a super-easy way to quickly make a lot of shimmery stars for my trees. I just love that shimmer paint!


I am very sad that Christmas is over, but I'm even more sad that I made TONS of Christmas gifts this year, but didn't take pictures of any of them so I could share them with you :( Thankfully, though, Valentine's Day is next on the agenda, so I've been busy making some fun projects to share with you in the coming weeks. One of my New Years Resolutions is to post to my blog at least 3 times per week...we'll see how that goes :) Until next time...


*******************************************************************


Stamp Sets: Season of Joy (110384—pictured below)
Paper: Old Olive (100702), Real Red (102482), Sahara Sand (105328), Whisper White (100730)
Ink: Real Red (103133), Old Olive (102277)
Punches: Star (109045), Curly Label (112208), Modern Label (116630)
Cool Tools: Big Shot (113439), Stampin’ Up! Textured Impressions Folder Petals-A-Plenty (116824—from the 2009 Holiday Mini Catalog)
The Little Something Extra: Silver Brads (104336), Champagne Mist Shimmer Paint (116806—from the 2009 Holiday Mini Catalog, but still available for purchase), Stampin’ Dimensionals (104430)